Posts

Showing posts from 2015

New Years Eve Manicure

Image
Hello my lovely readers, I can not believe in less that 24 hours we will be in 2016. This year just seems to have flown by; only seems like yesterday that Lexi was a couple of months old and now she's one time sure does fly when your having fun. For today's post I want to share with you my New Years Eve manicure. For this all I used was one stamping plate, gold Born Pretty Store polish and a Mini Ciate Nail polish I got in my advent calendar.  For my base I used this Ciate mini called Sass Pot this is a very dark purple creme, in some lighting this looks black. This polish is opaque in 2 coats and formula was easy to apply. I got this polish in my Ciate Advent calendar which I will have a full review and swatches of coming up soon. Once my base colour was completely dry and top coated I turned to my Moyou London Festive plate number 39, this was brought out recently and is the perfect plate for a New Years Eve mani. For my manicure I chose to go for the 3 cl...

Funky Fresh Jelly Sandwich

Image
Hello my lovely readers, well now that all the festivities are out of the way I can finally begin to breath again. I did have maybe five or six more Christmas manicures I wanted to get done, but I suppose they will have to wait until next year. After receiving  Decembers Nailbox  I was inspired to do a funky fresh manicure. I could not resist using Bloomsbury Way from Nails Inc as those pastel glitters were screaming out to me the minute I opened the box. Because I was happy with my  Winter Jelly Sandwich  I decided to try doing this with the Nails Inc Glitter. First I started off with two coats of Essie's Marshmallow, this is a very sheer white jelly polish so it is perfect for creating jelly sandwiches. I love the different combinations you can create with just one polish, I also felt that white would be a perfect colour for that fresh feeling after all the dark reds and greens that have been showing up over Christmas.  Once both of those coats had...

Decembers Nailbox- Funky Fresh

Image
Hello my lovely readers, I hope you have all had a fab Christmas and were treated to lots of nail goodies. I was very lucky as my day was full of polish, polish and more polish. I have a massive haul coming up of all the loot I received over the last few days. But first lets get into our swatch and review for December's Nailbox, this month the theme was funky fresh. They put in some fabulous polishes to get us ready for the new year, there was also some great little extras hidden underneath all of those packing peanuts. The box definitely had a freshening feel to it and was full of some lovely colours and that Nails inc glitter is to die for. So lets just get into these gorgeous polishes and fab little extras. As you probably can guess the first polish to catch my eye was this gorgeous Nails Inc glitter topper called Bloomsbury way. This is a glitter topper with a clear base and pastel pink, blue and white glitters in all shapes and sizes. It is a bit base heavy so you ...

Santa Claus Manicure

Image
Hello my lovely readers, I can't believe it is Christmas eve already I am such a little kid at Christmas. Can't wait to open up all my pressies tomorrow and see other peoples faces when they receive mine, especially looking forward to seeing Lexi's little face light up at the different activities going on throughout the day. So for my last manicure before the big day I thought nothing would be more appropriate that a jolly Santa mani. After all it is Christmas time when this magical man goes from house to house delivering toys to all of those sleepy little children. Lexi isn't really old enough to be aware of Santa Claus yet, but I am sure next year her daddy will have to dress up and leave some snowy boot prints leading up to the tree just to make it even more magical. Lets get into this Santa Claus nail art, I was inspired by  Kelli Marissa  over on Youtube. She recently uploaded an easy way to create a Santa Claus accent nail, follow the link if you would like to...

KB Shimmer Snowflake Polishes Swatch and Review

Image
Hello my lovely readers, well we only have 2 days to go until Christmas. I can not believe how quickly this month has gone, I have so many more ideas for Christmas manicures and I have just received my Bundle Monster Christmas plates. I guess they will have to wait until next year, I must admit I love the fact that my stamping plates can be used again and again. When I'm buying nail vinyls or decals I don't like to spend an awful lot on them as they can only be used once, but with a stamping plate I think it's definitely worth those extra few pennies. So lets get into why we are here, today I have some stunning polishes from KB Shimmer . This is a indie seller located in Indiana, there polishes are 3 free and does not contain toluene, formaldehyde, formaldehyde resin or dibutyl phthalate. They sell all types of nail polish from cremes to crelly's they also stock mani shots, decals and nail art tool as well as some hand and body lotions. I only own three polishes from ...

Decembers Meebox- Ice Queen

Image
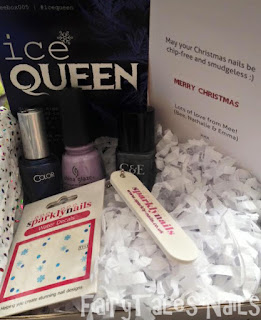
Hello my lovely readers, well it is that time of the month again where I get super pumped to receive my end of the month nail mail. This month because we have Christmas coming up the lovely ladies at Meebox sent out the boxes early so that we would get them in time for Christmas. This months theme is Ice Queen, being a huge Frozen fan I was highly anticipating this box. I am very happy to say I was not left disappointed, the polishes included in this months box are to die for and I am elated to have them in my ever growing collection. So lets get into this fabulous Ice Queen box, as usual I was greeted with the beautiful Meebox wrapping paper and this month they even added a lovely Christmas card which I thought was a great idea. Then after ripping open the paper carefully I found these 3 lovely polishes laying in the bed of paper worms, along with the polishes there are some lovely snowflake water decals and a nail file key ring from Sparkly Nails. The first polish that I p...

Christmas minion nails

Image
Hello my lovely readers, I can't believe we are only 6 days away from Christmas. I don't know if it is just me but this month has been flying by, I thought I had plenty of time left for some more festive mani's and some Christmas baking. So because I am running out of time way to fast I wanted to make some gingerbread cookies and mince pies, this resulted in my middle nail breaking so I am so sorry that he is a bit shorter than the rest. Hopefully with my Nailtiques formula 2 it will catch up with the rest before Christmas is over. So for today's festive mani I have painted some Christmas minions onto my nails, if my nails had been a little bit longer I would have been able to give them there little red jackets but unfortunately I had to settle for just the eyes and there little Santa hats for now. Lets get into how I created my 10 little mischievous friends. The first thing I did was choose my base colour, at the moment the only yellow creme polish I own is OPI I...

Christmas Eve Santa's Sleigh Ride Manicure using Danglefoot Nail Polish Higitus Figitus (2)

Image
Hello again my lovely readers well we are officially in the single digit countdown to Christmas, I for one am hugely excited. I used to love Christmas when I wasn't a mum and now that I am its even more magical, I can't wait to see the mischief Lexi gets into when there is a big pile of wrapping paper to jump into and to see her face light up trying her first ever Christmas dinner. As she is only one I don't think she will be into the whole Santa thing yet but that doesn't mean I can't have him dancing across my nails. So without further ado I would like to share with you lovely people my latest manicure for the festive season. As the base for this mani I used the beautiful Danglefoot nail polishes Higitus Figitus, this is the new version of this particular polish. It is a gorgeous deep black holographic polish it is fully opaque in two easy to apply coats and has an excellent formula. This polish is great to use to set the scene for some night time nail art...

Snowman Manicure using Danglefoot Nail Polish Eye Candy

Image
Hello my lovely readers, I can not believe that it is the 12th of December all ready. Only another 13 days until Christmas, I am happy to say I have got all my Christmas shopping done and dusted so at least that is one less thing to worry about. My boyfriend has told me that he has brought me nothing but nail polish for Christmas so I am super excited to find out what goodies he has picked. I will definitely be doing a Christmas haul post to show all of you fellow addicts my loot.  Today I have another festive inspired manicure for you all, I recently spent some of my pennies on some more Danglefoot Nail Polish . Among the beauties that I acquired from the lovely Hayley is this gorgeous dark blue polish called Eye Candy. I am utterly besotted with this polish, I mean what is not to love it is jam packed with iridescent blue and rainbow glitters. When this polish hits the light it look absolutely magical, it has a dark blue jelly base and is opaque in 2 ...

Essie Wintery Jelly Sandwich

Image
Hello my lovely readers, I am so sorry it's been a couple of days since my last post. I was hoping to get this up yesterday but Lexi had her 1 year injections and wasn't feeling fab afterwards so there was no time to write up a post. I absolutely hate seeing her in pain, but I know it is for the best to keep her safe from all those nasty bugs. Today's post will probably be quite short compared to my others, but I still wanted to share with you my Wintery Jelly Sandwich. This manicure is using Essie's Marshmallow and Essie's Stroke of Brilliance from their Luxe effects collection. I picked up Stroke of Brilliance in one of my  Tkmaxx hauls , click on the link if you would like to see the rest of the treasures I found. For my Jelly Sandwich the first thing I used was Essie's Marshmallow, this is a white jelly polish very sheer so perfect for creating a jelly sandwich. I brushed on two coats of Marshmallow and then used my top coat to make sure all of those l...